
Easy Headless Wordpress with Nuxt & Netlify III
Part 1 deals with setting up Wordpress as a Headless CMS.
Part 2 covers Vue, Nuxt and Tailwind.
Deploying your project to the web from a git repo is ridiculously easy using Netlify. I’m going to assume you are familiar with Github and have been committing your work from Parts 1 and 2 of this series.
Moving the local Wordpress install that we worked on in Part 1 to a live URL is outside the scope of this article, but I will say that I have had success using the pro version of WP Migrate DB. It is by no means the only option though.
Once your CMS is live you will need to change the axios baseURL in the Nuxt config.
// nuxt.config.js

axios: {
  baseURL: 'http://yourlivesite.com',
},
Add site in Netlify
Obviously you are also going to need a Netlify account for this, so if you don’t have one, you will need to create one. Sign up using your Github account and you will be able to access your repos.
In the Netlify dashboard, click New site from Git.
Under Continuous deployment click the Github button.
Pick the correct repo.
If it’s not set already, set the Build Command to npm run generate, and the Publish directory to dist.
Click Deploy site.
Netlify will deploy your site to a randomly generated URL that will end in .netlify.app. You have the ability to make your own custom .netlify.app URL or use a “real” domain name.
Any time you push to this repo’s master branch, Netlify will re-deploy the site for you. But the whole point of setting up a CMS was so non-developers could make changes and add content. So we also want to trigger a deploy anytime new posts are published or existing published posts are updated.
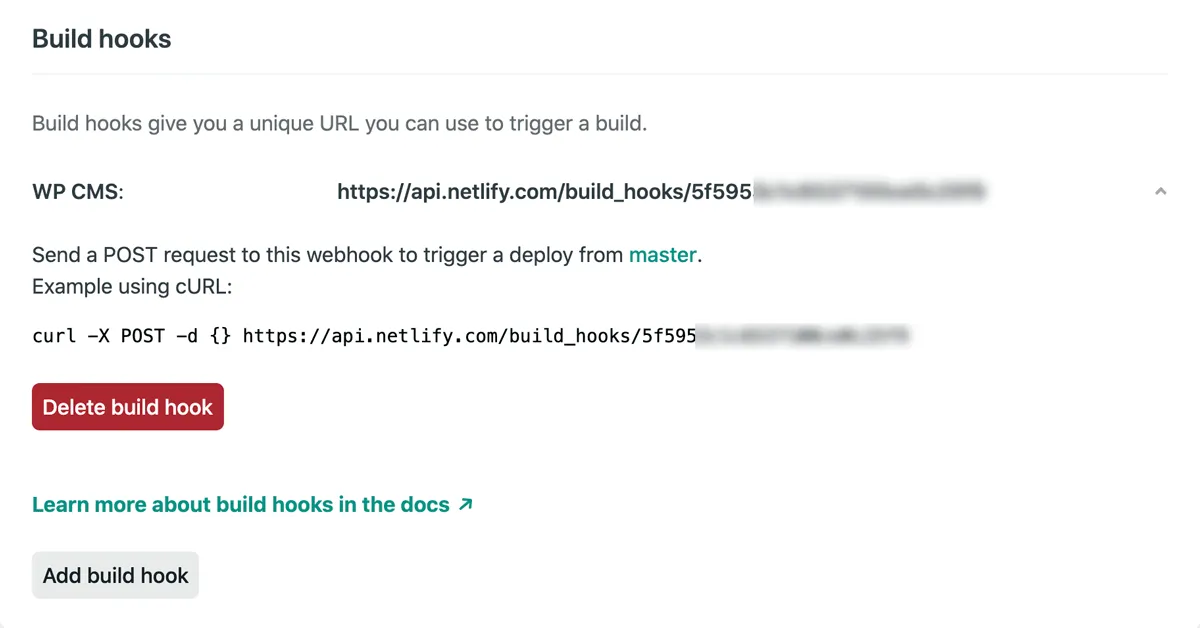
Generate Build Hook
Navigate to your new site in the Netlify dashboard and then to Site Settings -> Build & deploy -> Build hooks and click Add build hook. Give your build hook and name, and click Save.
Now we have access to a unique URL that we can use to trigger a build. If you click the dropdown arrow next to your build hook you, it will show you a cURL command that you can use to trigger a build directly from the terminal.
Trigger Build Hook in Wordpress
Back in Wordpress, we can hook into certain events and call the build hook. I initially tried to set this up myself following the instructions outlined in this article. It hooks into the publish_post, publish_page and post_update Wordpress hooks, and uses PHP’s built in cURL library to trigger the build hook.
Sadly I could not get that code to work reliably. I’m not sure if it was permissions issues or very likely I was doing something wrong. Either way I opted to use a plugin, and I’m glad I did because it offers several benefits which greatly improved the user experience for the designers using the CMS.
The plugin is called Jamstack Deployments.
Once installed, navigate to Settings -> Deployments and enter the the URL of your build hook. The plugin gives you the ability to choose via checkboxes which Post Types, Taxonomies, and Post Statuses will trigger a build.
For purposes of this demo, you should check Events under Post Types and Published under Post Statuses.
It’s nice to be able to turn the settings on and off via the dashboard. But my favorite feature of this plugin is the Status Bar that it adds to the Wordpress dashboard.

To get the Status Bar working properly, two URLs need to be added in the Jamstack Deployments settings. The URLs can be found in your Netlify dashboard under Site Settings -> General -> Deploy status badge. The first URL that ends in /deploy-status is the Badge Image URL and the second URL that ends in /deploys is the Badge Link.
![]()
With those settings entered, the current status of your Netlify site is displayed and updated in real-time in the Wordpress Dashboard.
The status bar also has a Deploy Website button. I found this feature extremely useful as well. If you know you or someone will be making a lot of updates to the site at once, you can temporarily turn off the auto-updates and just hit the Deploy button when you are finished.
And that’s it! Our content-managed website built with Vue, and Wordpress is live and content is updating automatically.
As always, thanks for reading!